Email Marketing Made Easier with WPForms – The New MailChimp Integration
WPForms has introduced a new Addon, which is none other than the MailChimp Addon. This Addon will help you to create the subscription form for MailChimp subscription easily. Know more about the MailChimp Addon and how to use this Addon introduced by WPForms.
I’m an affiliate partner with WPForms, and I’ll be paid a small compensation if you subscribe to the premium version of WPForms for making use of the MailChimp Addon.
There are many benefits of using WPForms for creating forms for your WordPress blog, and the latest benefit is that it may help you to increase your email subscribers if you’re using MailChimp’s email marketing service.
Table of Contents
How to Use the MailChimp Addon to Create Newsletter Subscription Form?
I’ll let you know the easy way to use the MailChimp addon for creating the newsletter subscription form for your blog. You’ll be saving your time by going for MailChimp AddOn.
1. Install MailChimp AddOn to Create Subscription Form
This is the first step and the most important step for creating the subscription form.
Once you purchase and install the WPForms plugin, then you need to go to WPForms>>Addons and then find the MailChimp Addon.
After you activate the Addon, you need to go to WPForms>>Add New.
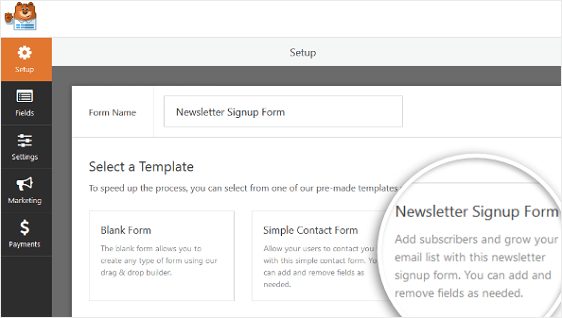
You’ll be asked to name your form. You should select the Newsletter Signup Form template before you proceed to the next step.
The best feature is that you can add and edit different fields easily. One of the most important fields to add could be the GDPR Compliance option in the form. If you’re unable to add the GDPR Compliance field, then you can tick mark the GDPR Compliance checkbox in the WPForms settings.
2. Connecting the Subscription Form with MailChimp
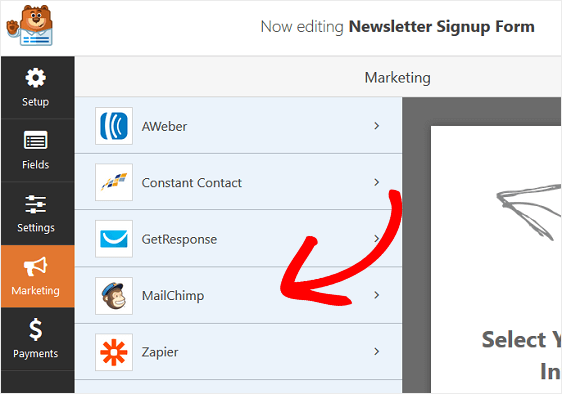
Visit Marketing>>MailChimp.
You’ll need to add a new connection and name your connection.
Thereafter, you’ll need to add the MailChimp API Key.
This API key can be availed only from the MailChimp account.
You won’t be able to connect your form to your MailChimp account unless you add the API key.
Do remember that you need to access your MailChimp account and then visit Your Profile>>Extras>>API Keys to obtain the API key.
You’ll be able to have an active connection between the subscription form and your MailChimp account only after copy-pasting the API key and completing the required connection procedure.
Once the API key is added, you’ll need to select your account email id, the email list you want people to be added to, and other crucial details required to complete the procedure of connecting the form and your MailChimp account.
3. Configure your Subscription Form Notifications and Confirmations
You can configure the notifications option to know about the new email subscribers.
The confirmations option allows you to make the subscriber know that the subscription has been confirmed. You’ll get 3 different options to choose from when it comes to Subscription form confirmations.
4. Add MailChimp Subscription Form
You have the option to add the subscription form to a post, page, sidebar and other options are available too depending on your blog’s functionality. Install the form properly to increase your email subscribers.
Benefits of the MailChimp Addon
- Saves Time.
- More Email Subscribers.
- The best type of subscription form.
- Easy Installation.
- Makes work easier for bloggers.
- No need to install different plugins.
WPForms has bought many new addons regularly. The integration of WPForms with MailChimp will make things easier for bloggers, and many bloggers will be able to get more email subscribers. Do let me know if you find the new MailChimp integration as one of the best features of WPForms.


![WPForms Introduces SalesForce Addon : [Benefits and Installation Guide] 11 WPForms SalesForce Addon Benefits and Installation Steps](https://mybloggingideas.com/wp-content/uploads/2020/10/WPForms-SalesForce-Addon-150x150.png)

![WPForms Introduces SalesForce Addon : [Benefits and Installation Guide] 13 WPForms SalesForce Addon Benefits and Installation Steps](https://mybloggingideas.com/wp-content/uploads/2020/10/WPForms-SalesForce-Addon.png)
